 With the master cylinder bore honed smooth, everything can be put together. Thankfully, the brakes don’t need a jerry-rig to get back into shape; remarkably, Napa still makes and sells off-the-shelf rebuild kits for brake systems this old. It was merely a matter of walking up to the counter and placing the order. Had it in my hands the next morning; gotta love America and mass production—auto parts off the shelf.
Here is the content of the rebuild kit, laid out against the same parts from the disassembled cylinder assembly. To all appearances, the parts are identical. I was more than a little surprised to note that the primary seal looks like it was even cast on the same mold, so maybe the brakes have been rebuilt at some point in the past more recent than “never.”


All but one of the parts—the spring, into which the valve assembly snaps—have a replacement part. As mentioned, I want to use original equipment, reconditioning it if necessary, so the secondary seal came off the new piston and was put onto the original that I removed. The old valve assembly snaps out of the spring and the new one snapped right into place. One that was in place the innards were assembled as shown in the images.


Keep in mind that the piston and seals don’t just drop in place; they have to be pushed because they fit tightly into the bore.
Once the piston, seals, spring, and valve are in place the challenge becomes assembling the mechanical linkage. The pushrod assembly has a plate at one end that seals off the mechanical end of the master cylinder. The pushrod itself has an acorn head that engages the cupped end of the piston with the secondary seal. Because the two pieces are not threaded or locked, the pushrod can turn and moves at a slight angle when the brake is engaged. That freedom of movement allows the pushrod to be turned with the knurled nut on the shaft allow it to be threaded into the fork on the brake shaft (today we’d probably just make the shaft hexagonal for a wrench). The boot threads over the knurled nut on the pushrod. The round plate on the assembly fits into the end of the brake cylinder. The snap ring holds it in place, and then the boot covers everything. Won’t say how many times I took it apart because I missed something.


So here are before and after shots of the brake master cylinder, both taken as if looking at it from the driver’s side. The plunger at the left is the link to the brake pedal (the fork visible in the “before” picture got removed and put back onto Green so I didn’t lose it). The brake line itself threads into the cap on the right end.


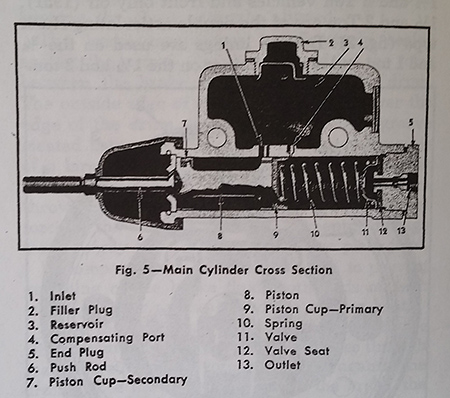
Here is a section of the complete assembly from the shop manual, shown in working order for context.
And that’s that. Ready to go back onto the Green Truck.
